

A Sister's Journey · Bestiary & bosses
Read enemy behavior, boss locations and combat hints; boss entries are folded to avoid spoilers.

Boss encounters · spoilers
The ten bestiary encounters use conditional attack selection, not one fixed timeline. Movement, landings and animation events can hold or reset a counter. Values below are AI-update counts or explicitly named counter values, not seconds or guaranteed damage frames. The listed checkpoints are verified; a complete second-by-second trace of every attack is not yet established.
Difficulty / assistance
Spiritual Guidance must be enabled for its individual assists to apply. Increased damage multiplies ordinary damage to non-player targets by 1.3 before integer rounding; it does not lower the Boss health pool. Reduced incoming damage is not a flat percentage: ordinary damage above 1 loses one point, then loses another if the reduced value is still above 3. Thus 1/2/3/4/5/6 becomes 1/1/2/3/3/4 in that branch. Special damage uses a separate branch. Easier enemies changes selected timings and behaviors, not every attack by the same factor.

Mykorake
Transformed by the Corruption, this fungal-like creature is of immense size, and seems to have become some sort of leader to the smaller Fungal Slimes in its cave. Together, they almost overwhelmed me, and I am fortunate to have escaped those caves alive. The best way to deal with these kinds of situations is probably not letting the smaller ones swarm all over me, and deal with them first. But it was wise to always keep an eye on the big one, else I probably would have been crushed.
Defeat Mykorake in the Infested Caves.
Starting encounter HP
3,500
Health gates
< 50% · 1750
AI counter
40
Below half health, Mykorake jumps to the centre and enters its transition sequence. The next phase follows that sequence rather than another HP gate. Its attack-preparation state sets a 40-update counter before firing.
Attack flow and assists
Jumping and landing alternate with a prepared shot. Below half health: centre jump → rumble → fall → summon sequence → later-phase attacks. Landing and movement gates mean those steps do not have a universal elapsed duration.
Confirmed timing checkpoints
Shot preparation sets a 40-update gate, then firing sets a 35-update gate. The post-jump gate has several branches; Easier enemies adds 12 to the selected gate.
Dominator
This so-called "Dominator" was a grotesque contraption put together by Merinos, one of the Crimson Eye's higher ranking members it seems. While his naming choices seem questionable, he certainly seems to know his stuff about building deadly devices. While dangerous, this tank always seemed to move in the same similar patterns, making it possible to adapt to them and dodge its attacks, until there was an opening. This tactic seemed rather efficient in the end, so I should keep it in mind for similar dangerous encounters in the future.
Defeat the Dominator in the Cult Hideout.
Starting encounter HP
7,700
Attack flow and assists
The base, side cannons, upper section and large cannon run separate tracks. Expect cannon preparation and shots alongside gem beams. The second-phase transition is signalled between components; no fixed percentage threshold has been verified.
Confirmed timing checkpoints
Base action counter: trigger when greater than 380 normally or 440 assisted; phase two subtracts 100 from either limit. Large-cannon repeat delay: 50 → 60 with assistance. These overlapping tracks are not one attack every 380 updates.
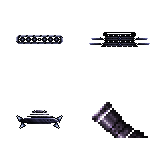
Dominator artwork shows its four separate components; it is not an assembled sprite.

Merinos
After arriving in the Spirit World, I soon stumbled upon Merinos again. Which definitely confirms that the cult is active in this world as well. This time, he faced me directly, and to my surprise, he seems rather adept at fighting with guns as well. I probably shouldn't take him too lightly. He is surprisingly agile in combat, and his capability to design weapons speaks for itself. Still, I managed to beat him, and on top managed to snatch his Impact Cannon from him.
Defeat Merinos in the Kershan Heights.
Starting encounter HP
8,200
Health gates
≤ 50% · 4100
At half health or less, the attack selector heavily prioritizes the action leading to the second phase. Finish dodging the current action before moving in.
Attack flow and assists
Movement between firing positions leads into shots, mines or one of three special sequences. The special sequences have their own movement and return states; the half-health check changes selection priority.
Confirmed timing checkpoints
The ordinary firing branch configures first/repeat delays of 30/30; Easier enemies changes these to 40/50 while retaining three shots. Other branches have different delays, so this is not a universal firing rate.

Darkthorn
This root-like creature was especially strong among its kin, and seemed to have taken the dark depths of the ancient Deeproot Shrine ruins under his control. Its attacks were fast and vicious, but I managed to bring the monster down. The Corruption's influence could clearly be seen on this one, and shows what might be awaiting us all, if not stopped.
Defeat Darkthorn in Deeproot Shrine.
Starting encounter HP
9,200
Health gates
≤ 80% · 7360 / ≤ 50% · 4600
AI counter
35 → 20
The 80% gate enables a conditional special-action selection; it is not an immediate phase switch. At 50%, the later phase begins at a specific point in that action. The front-attack follow-up spacing parameter drops from 35 to 20 AI updates in the later phase, leaving less room between strikes.
Attack flow and assists
The selector chooses front strikes, a spread, a jump, a charge or the war-cry transition. Front strikes have multiple animation cues; stay clear until the follow-ups end.
Confirmed timing checkpoints
Front-strike counter starts at 200, or 230 assisted. The warning is at remaining count 195 and the first swing animation at 135: 65 or 95 updates from entry. Follow-up spacing parameter: 40 normally, 35 in phase three, 20 in phase four. This marks animation starts, not hitbox contact.
The attack set includes a charge, a frontal strike, a spread attack and a jump attack. Watch the wind-up, move out of its path, then punish the recovery. Its configuration disables stun and slow, so prioritize reliable damage and escape space.

Asura
Damn! After a hard and intense fight, I still didn't manage to bring her down. It was rather the opposite. She is a strong opponent, probably the strongest I've met so far. Asura is able to control storm and lightning, further imbued with some sort of Corruption power, and is extremely talented in melee combat as well. While Merinos acts rather direct, Asura seems much more sharp and dangerous. And probably more powerful, too. I should be especially cautious around her.
Defeat Asura (well, let's call it a draw) in the Silent Ruins.
Starting encounter HP
12,500
Health gates
≤ 65% · 8125 / ≤ 35% · 4375 / ≤ 10% · 1250
The first Asura encounter checks 65%, 35% and 10% health to prioritize successive transition actions. Keep an escape route as each gate approaches; a gate is not an instant vulnerability window.
Attack flow and assists
Asura combines flurries, charges, spins, homing orbs and blink follow-ups: brambles, explosions, a down-smash or a super-smash. Some routes return to another blink decision instead of ordinary recovery.
Confirmed timing checkpoints
Flurry/charge entry counter: 300 → 330 assisted. After a blink, the next-decision delay changes from 1 to 20; special vertical-blink branches can override it. The base down-smash checkpoint shifts from remaining 258 to 240, adding 18 updates before that checkpoint.

Morlurkh
A cunning little creature, also a bit weird. Seemed to be obsessed with eating, shiny things, and well... Eggs, I guess. Still, I managed to beat the creature, and took the Pendant of Vitality from him. I had to be cautious to not get overwhelmed during the fight, but with the right approach and enough firepower, I could prevail in the end.
Defeat Morlurkh in the Underflow.
Starting encounter HP
5,000
Health gates
< 25% · 1250
Below 25%, the attack selector strongly prioritizes a special action while the internal phase is between 1 and 3. This is a low-health behavior gate, not evidence of three separate HP thresholds.
Attack flow and assists
Rummaging, repeated jumps and the egg-jump sequence have separate branches. The egg-jump advances the internal phase; the low-health check is not three separate phase thresholds.
Confirmed timing checkpoints
Rummaging returns to an idle counter of 25; the jump sequence returns to 50; the egg-jump sequence to 150. Repeated-jump counts depend on the phase and landing checks. Easier enemies reduces the egg-jump movement-speed cap by 20; that is a movement adjustment, not 20 seconds.

Rokthor
A strong member of the Stoneboar Tribe, and a dangerous fighter as an opponent. His mighty club certainly isn't just for show, and his forceful attacks almost brought the whole arena crashing down on me. The cheerful audience didn't seem to mind though. Still, Rokthor fights with honor, and understands what is at stake. He has earned my respect.
Defeat Rokthor in the Stoneboar Arena.
Starting encounter HP
15,000
Health gates
< 70% · 10500 / < 40% · 6000
The 70% and 40% gates prioritize the ground-smash transition. The phase counter advances during that action, not at the exact moment the HP threshold is crossed.
Attack flow and assists
Rokthor selects upheaval, spike-smash, ground-smash, war cry, jumping and charging. The 70% and 40% health checks prioritize transition actions; the phase advances during the sequence.
Confirmed timing checkpoints
Charge starts with counter 300, or 290 in phase three; Easier enemies uses 330. The assist also reduces the charge movement-speed cap by 30. Other attacks keep their own animation and landing gates.
The attack set includes a charge, a jumping strike, a spike smash and an upheaval attack. Keep room to move before the wind-up. Its collision setup prevents stomp damage; use your gun rather than trying to defeat it by jumping on it.

Franky
Franky likes to tinker around with guns, so we got along quite well from the start. He might seem a bit strange at first, but he's a brilliant inventor, and I am really amazed by his so-called Arcane-Tech. He challenged me to battle to test (and probably show off) his Arcane Reaper, and well, it surely does pack a punch.
Defeat Franky in the Shrouded Wilds.
Starting encounter HP
14,000
Health gates
≤ 60% · 8400 / ≤ 1% · 140
Attack flow and assists
Franky alternates sickle jumps, upward sickle attacks, ledge movement, ledge spikes and a centre-smash transition. Health checks at 60% and 1% are position-dependent selection gates, not instant phase changes.
Confirmed timing checkpoints
After upward sickle / ledge-spike flip, the idle counter changes from 50 to 35 in phase two. After sickle jump it changes from 50 to 30; after ledge firing, 25 to 15. No dedicated Easier enemies timing branch was found in Franky’s dispatch; global damage assists remain separate.

Crakk
This rocky creature sure likes scarabs a lot, or they at least seemed to like the beast, once. I'm still not sure if I just made it angry by disturbing its sleep, or if it was indeed a clever laid out trap to lure careless adventurers in. This beast certainly was not an easy foe to beat, fortunately I managed to keep up with its fast movements and managed to bring it down.
Defeat Crakk in the Neverending Cascades.
Starting encounter HP
16,200
Health gates
< 80% · 12960 / < 50% · 8100
Below 80% and then 50%, Crakk prioritizes its war-cry transition. The phase advances inside the mouth-animation sequence before charge preparation resumes.
Attack flow and assists
Burrow preparation → underground action → emergence; or spit; or charge preparation → charge → optional extended charge → recovery. War cry handles the health-gated transitions.
Confirmed timing checkpoints
Burrow recovery sets idle to 50; extended-charge recovery sets it to 20. Several stages reset their internal counter to 300, so adding those numbers does not give a valid attack duration. No dedicated Easier enemies timing branch was found in this dispatch.
Crakk has mouth-opening and spinning animations, and two collision regions marked to deflect hits. Keep repositioning and test a clear firing angle instead of repeatedly shooting a surface that deflects your shots.

Asura & Merinos
Both of them alone are already tough opponents, but facing both together was... brutal. They showed me once more what they are capable of, and by combining their deadly attacks, I almost had no room for error during this fight. It was not an easy victory. But still, it brought me one step closer to them, and to Rena... I hope.
Defeat Asura and Merinos in the Desolate Reaches.
Starting encounter HP
21,000 · Shared by both bosses
Attack flow and assists
Both Bosses use the shared 21,000 pool. Asura adds blink-orb casting and coordinated blast/beam attacks; Merinos uses overhead bombardment, stationary blasts, dives, zigzag beams and rising/sweeping fire. Partner signals coordinate these tracks.
Confirmed timing checkpoints
Asura’s flurry/charge entry counter again changes from 300 to 330 assisted, with the base post-blink decision delay changing from 1 to 20. This does not apply a blanket slowdown to Merinos or to the coordinated beam. Individual combo durations remain conditional.
Giant Bat
These bats seem unnaturally huge and aggressive, probably due to the influence of the Corruption, and seem to prefer caves and other dark areas. While aggressive, they still don't seem much of a threat, and can easily be dealt with. A quick, direct attack after dodging theirs always seems like a solid strategy.
Cave Bat
A small cave bat, probably still unaffected by the Corruption, or at least not showing signs yet. Generally harmless. They seem to like the company of larger bats, but are eager to flee once they sense danger.
Fungal Slime
A slimy creature, originally probably some sort of mushroom, until the Corruption started to slowly transform it. They still seem relatively peaceful, unless angered, and are rather easy to be dealt with - if I don't allow them to overwhelm me in sheer numbers. Stomping them seems to work well, too.
Tentacle Worm
This worm-like creature can generally be found in caves and similar environments, and often likes to burrow underground, to surprise its prey. When they are burrowed, they can be quite a nuisance and catch me unprepared if I'm not careful. Once I notice they have infested an area, I should be extra careful when exploring. Once unburrowed however, they are pretty exposed and can be dealt with quickly, as they don't seem to be able to move around on the surface.
Dusk Maggot
These slimy, creeping creatures are rather slow and fortunately not much of a threat. They seem to like dark and moist places. They will attack when not moving out of their way, but other than that can easily be avoided. Stomping them seems like a straightforward approach, after a few kills however I rather advise using my guns. My shoes are still sticky.
Tiny Leaf Slime
These little fellas are rather cute, and I bet would be quite friendly, if not for the Corruption's slow influence. But compared to other creatures, they still are relatively peaceful. They might attack though, if I get too close. When attacking in large numbers, I could see them becoming a meaningful threat, on their own they can easily be dealt with.
Stumpy
A fitting name I suppose, as it is, well, a walking stump. It seems rather peaceful, I might get knocked out of the way though if I happen to stand in its path. Generally, they aren't much of a threat, so I very well might leave them be unless fighting is necessary. Plus, they can serve as an extra platform!
Root Gnome
These small creatures certainly seem to taunt me at every opportunity they get. And while they might not look it, their impulsive moves still make them dangerous if I'm not cautious. It's probably best to deal with them from a distance, as you never know when they might suddenly jump you when too close.
Root Runner
Fast moving root creatures, which can become quite nasty, especially in numbers, or when charging at you while I'm already busy fighting other enemies. When they attack, they charge forward while flinging their arms - or roots - in all directions. A good strategy is to wait out one of their attacks in cover, then quickly attack and take them out fast while they pause.
Rock Thrower
These strong root creatures especially like to ambush, and often lurk in places above ground so they can throw their deadly rocks at you. Their aim with their rocks is surprisingly good, so I should be on the move constantly to dodge them, or seek cover. If possible, I should try to find a safe path to them to take them out quickly, or find a good ranged position myself.
Tiny Fruity Slime
They are likely related to those Tiny Leaf Slimes, and are every bit as cute. They are quite peaceful, and smell of fresh berries. Being not particularly dangerous, I might just leave them be - it seems however that whenever I'm in need of healing, defeating them surprisingly helps me getting my strength back.
Rockow
These trickery little creatures like to hide below the earth, waiting for a change to ambush, with the grass (or is it hair?) growing on them acting as perfect cover. Keeping an eye out for their grassy heads seems like a good advice, they tend to hide within other patches of grass though, smart little pests. Still, once unburrowed, they are without cover and can be taken out quickly as long as I manage to dodge their attacks.
Root Chief
Similar to the beast called Darkthorn that I encountered in Deeproot Shrine, these creatures are just as deadly, and are probably related in some way. Fortunately, their attacks and skill in combat seem slightly underdeveloped compared to their leader. Still, they are formidable foes and extremely dangerous, and take a lot of firepower to take down.
Mini Tank
These small machines look like tiny tanks, although they don't seem to be equipped with any weapons. All they do is trying to run me over. When they detect an enemy in front of them, they accelerate, making attacks from above or behind the best strategy.
Spiky Spinner
Strange flying contraptions, equipped with deadly spikes to shred its enemies to pieces. When they detect an enemy, they start to chase. While their spikes are deadly, these machines aren't especially fast, so keeping a safe distance while taking them down is a good way to deal with them.
Gun Turret
A stationary turret equipped with a movable gun. Deadly, but also predictable. When blasting them from a safe distance isn't an option, getting into its blind spot is a solid approach, since the gun needs time to readjust, giving me time to deal some damage.
Toxic Slime
A slowly creeping, slimy creature, trying to gradually digest everything in its path. Fortunately, they aren't especially fast and are easy to avoid, but can still be troublesome. Its touch burns like acid, so I better keep my distance and get rid of it, before it comes too close.
Blurper
It's hard to describe what this creature really resembles, but the poison blops it keeps spitting out are certainly deadly. The blops are so thick and solid, they keep absorbing my bullets, so a frontal assault is rather ineffective. Additionally, the released poison lingers for some time, so I should stay clear from whereever those blops burst. Attacking them from behind seems reasonable, although they seem especially vulnerable from above.
Slime Observer
These floating eyes always keep scanning their surroundings, and move to attack as soon as anything suspicious meets their gaze. When spotted, I should try to keep my distance and attack from afar, or try to get above them. Once the eye bursts though, I need to beware its slimy inhabitant.
Slime Creeper
These slow-moving creatures might seem easy to avoid at first, but their rapid lunging attacks can be both agonizing and deadly. I should prepare to evade whenever coming close to them, or try to provoke an attack, and then quickly dodge. Additionally, I have to stay clear of the poisonous substances they release.
Murk Runner
They seem to prefer moist environments, but these troublesome pests tend to appear almost everywhere. By themselves, they aren't particularly dangerous, but multiple ones jumping at you from different directions can quickly become annoying and dangerous. Best to always keep above them.
Nosebert
These flying creatures seem rather calm and peaceful, and tend to fly around at a relaxed pace. Still, when coming too close, they like to fling their tiny little tentacles at me, or bump me with their head. Jumping on them works rather well, though.
Biteworm
Just as its name suggests, this worm is equipped with long, sharp teeth, and tends to crawl around looking for prey. While it's best to stay clear of its path, it still is rather slow and does not pose much of a threat.
Spikeworm
They appear similar to the regular Biteworm, but have now almost completely been consumed by the Corruption. Making them much more vicious and deadly. Spikeworms are much tougher, faster, and aggressive, and I should be extra cautious of their lunging attacks. I better always keep a good distance.
Wrapped Crawler
What was once wrapped in these linen is long gone now, and has been transformed into this hideous, ever-crawling creature. Despite their grotesque appearance, if I manage to stay clear of their hungry mouths I should be able to deal with them fairly easily.
Abyss Crab
A tough and deadly beast, equipped with a durable, spiky shell. It moves around on its many tentacles, and instinctively hides when in danger. This creature is tough to beat, as it defends itself whenever I try to deal some damage. When attacking, I should try to focus all my firepower, so I can get as many hits in as possible, before it hides again. Its protective behaviour can be utilized as my own defense though, stopping it from charging at me by trying to force it into hiding.
Spike King
An extremely large, corrupted slime creature, probably as large as the one I encountered in those coastal caves, who called itself Mykorake. This one has some nasty spikes though. Another gruesome example of what could happen if the Corruption completely takes hold of someone, or... something. As I already have some experience in fighting this kind of creature, I should be able to evade its attacks, and attack it while there's an opening.
Depth Hunter
Large, scary-looking fish with sharp teeth, which can be found in all kinds of waters, hunting. It doesn't seem to attack smaller fish though, humans on the other hand... I should carefully check every body of water before jumping in, else I could end up as an involuntary snack. Their swim patterns seem predictable, and thus avoidable though, so I should be able to handle them without much of a problem.
Blood Spitter
While not exactly spitting blood, the name likely originated from the color of whatever it is they are spewing out. These can become fairly dangerous when getting too close, but taking them out from afar, when possible, should work well. I need to be careful though, some tend to be growing on walls or ceilings. When overwhelmed, it might be best to retreat, to take them out one by one.
Veracrab
While not technically a crab, this plant-like creature sure likes to move like one. They appear rather harmless, cute even - until they start shooting their pointy leaves. When they start to attack, it is best to keep some distance, and dodge if necessary. Other than that, it should be possible to take them down without much trouble.
Spore Fungus
A grotesque fusion between plant, mushroom, and... something with eyes. Very dangerous and best avoided, unless properly prepared. A Sturdy and dangerous lifeform, that's for sure. These eyes it launches are treacherous, and I should closely watch and evade them. Shooting them down however seems to work, too! Stomping on them is definitely not advised though.
Entangled Watcher
An entangled mass of vines and roots, with one head-like sprout spewing deadly eye-like seeds. They seem to be able to grow almost everywhere, including out of walls. Using the environment can be very helpful when dealing with them, to take cover from their attacks and wait for an opening. Additionally, while dangerous, those eyes can be popped easily - If I can manage to bring them all down before they reach me.
Whirlbloom
A small, but treacherous creature, often lying in wait to suddenly attack with their razor-sharp leaves. Once they become active, keeping a good distance is advised. While they can be deadly, their attacks seem predictable, so I should be able to evade them and follow up with a good counterattack.
Death Stinger
A giant-sized mosquito, which seems to have developed a taste for human blood especially. They often appear in groups, which doesn't help either. They often seem to fly around in unpredictable patterns, making it difficult to get a good aim at them. As they only seem to attack in smaller, close-range lunges, always keeping out of their reach seems like the straightforward approach. However, while certainly more dangerous, trying to get directly above or below them while they pause might provide a good opportunity to take one out quickly.
Giant Rat
These rats seem to have grown unnaturally big and aggressive, and can often be encountered in damp, underground areas. While they can run extremely fast, it should be easy enough to deal with them, since running around seems to be all they do.
Toxic Rodent
These mutated rats have formed poisonous blisters on their body, making them an even more dangerous opponent. Stomping on these blisters generally seems like a bad idea, and I should be careful to always stay clear of their poisonous attacks.
Spiked Runner
These enormous rats have grown deadly spikes on their back, and seem to be relentless at charging at their prey. They can become very dangerous when getting too close, so I should always be ready to evade and dodge their deadly charge attacks.
Corrupted Slime
One of the many smaller slime-like creatures, now fully twisted and transformed by the Corruption, making the unnatural aggression they show all that's left of them. Still, if I manage to keep a good distance between me and them, it should be easy enough to take them out one by one. And as always, stomping them is a solid choice as well.
Mountain Roller
A sturdy rock beast, often found living in mountainous areas. They seem to enjoy rolling over anything that happens to be in their path. When they are about to charge, it is probably best to hide and keep out of their way.
A Sister’s Journey · Steam · © Florian Lackner